
Saturday, December 31, 2022
Happy New Year
Its been two weeks since our last class and it still hasn't sunken in that we will no longer have IS101 with Professor Wu. For me I am so glad to have taken this class and mastered MO-100, MO-200, MO-300 and gotten my badges. My next adventures has taken me to a program similar to word and excel. Even though I have to put in time like I did in IS101 in the end it will be worth it. I have no idea where this will take me but I am hoping to be working from home more than usual. To all you that had taken IS101 with Professor Wu I just want to wish you and your family a safe and happy new year.
Tuesday, December 20, 2022
Farewell IS101
It has come to this, the final days of IS101. Can't believe the end is here. How time flies when you are having fun. This is far the best class that I have taken. From Professor Wu and all his support and time he has put into each and everyone of us to my peers. Just wanted to say Happy holidays to everyone from my family to yours. Have a happy and safe New Year.
Thursday, December 15, 2022
6.6.4 SmartArt and Shape Facts
When creating a PowerPoint presentation adding shapes, smart arts, charts, and even tables can make your presentation more appealing to the audience. It would capture there attention to focus on your slides. Making your slides easy to follow and read for audience will help them remember your presentation. It doesn't have to be over whelming with features but having one or two does help making your slide get across to your audience.
SHAPES - can help you draw attention to a certain point on your presentation. You can also add animation to the shape too.
SMART ART - can help your audience see the steps your are trying to convey to them. You can turn bullet point to smart art
CHARTS - is a good way to show the data you have collected. Using the right chart may take a little more time for you to master.
TABLES - help organized data to be able to be understand.
Here are some other facts to help you understand a little bit more from LabSim
Image 1: Insert Tab Groups
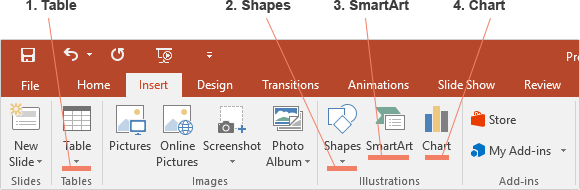
Table 1: Table & Illustration Features
FEATURES/TERMS
DESCRIPTION
1. Table
Tables organize data into a more readable and easier to comprehend format. The Table tool on the Insert tab provides an easy-to-use grid to define the initial table dimensions. If you don't know exactly what the dimensions of your table need to be, you can always insert additional rows and columns later.
2. Shapes
Shapes are often used in PowerPoint presentations to point out or draw attention to specific information. For example, an arrow or star shape. To create a shape, click Shapes in the Illustrations group. Click and drag to create the shape size you want. To create a circle, a square, or another regular shape, hold down the Shift key while clicking and dragging.
3. SmartArt
Using SmartArt is one of the best ways to visually represent ideas. SmartArt is commonly used to show steps in a process, to demonstrate connections, or to visually organize information that isn't organized sequentially. To select a piece of SmartArt, click SmartArt in the Illustrations group.
4. Chart
Charts are an excellent way to visually organize data. With a chart, it is easy to show trends, patterns, and relationships. Choose a chart type by clicking Chart in the Illustrations group.
Saturday, December 10, 2022
Excel Printing Features
When someone says to you, "print me out this spreadsheet". The unexperienced Excel users will usually think ok just hit print. Not realizing you can do a lot of adjustment while on the backstage printing page. What I mean is that, you can set printer selection, sheet selection, paper sides, paper collation, paper orientation, paper size, margin settings, and scaling options. That's just in the backstage view of printer tab. Even inside Excel under the Page Layout tab you can make adjustment with print area and print titles. We wont get into it with those two option cause that takes more of an understanding of Excel. So what's to know about the backstage view of printer page is;

PRINTER SELECTION - in some office setting they're could be more than one printer that you could be printing out on. Like a plain black and white or a colored printer
SHEET SELECTION - you can choose to print out the whole workbook or just certain pages from the workbook that you need.
PAPER SIDES - one of the features on a newer printer will be if you want to print out on both sides of the paper.
PAPER COLLATION - is another feature on most printer you have to know how you want your print to come out. would you like it to come out with pages 1,2,3, or 1,1,1 then 2,2,2, etc. even some printers will even staple it for you.
PAPER ORIENTATION - how do you want your paper to print out the long side of the paper going vertically up an down (portrait) or long side on top and bottom going horizontal (landscape)
PAPER SIZE - every printer will have different trays to hold different sizes of paper from legal to letter. It may have just one type of paper but will your spreadsheet fit on that paper?
MARGIN SETTINGS - you can change the margins of a printout but you should customizes them on the margins tab in Excel
SCALING OPTIONS - this options is so you can shrink or enlarge your print to fit on one page depending on the size but that's you to you.
Here is some additional information from LabSims you can look at
Table 3: Excel Printing Features
FEATURES/TERMS
DESCRIPTION
1. Info & Properties
The properties of a workbook provide metadata—information that describes the document. This information includes the document title, author name, subject, and keywords that identify the contents of the file. To modify a document's properties, go to the Info tab of the Backstage view and click on the property you want to edit.
2. Printer Selection
You may already be connected to more than one printer; for example, the printer you use at school and the printer you use at home. The default printer will be displayed by name under Printer, but you can easily select a non-default printer to use. To select a non-default printer, simply select the printer from the Printer drop-down list (you may need to add the printer to your computer's configuration first).
3. Sheet Selection
By default, Excel will print only the active worksheet, which is usually the worksheet that is currently displayed in your workspace. But if needed, you can choose to print all worksheets in the workbook or even a particular selection of cells.
4. Paper Sides
If your printer supports double-sided printing, you have two options for how it can print: flipping the paper on the short edge or on the long edge. If your printer does not support double-sided printing, you can select the option to manually print on both sides, which requires you to manually flip and reload the paper into the printer.
5. Paper Collation
By default, Excel prints collated copies of your worksheet, which is usually the best choice. If you have a multiple-page worksheet that you are printing for six peers to review, the default collated option will keep each copy of the worksheet together, rather than printing page one six times, page two six times, page three six times, and so on.
6. Paper Orientation
There are two types of page orientation. Excel's default page orientation setting is Portrait, where the long edge of the paper is vertical, but worksheets can also be printed in Landscape orientation, where the long edge of the paper is horizontal. Page orientation settings can also be found on the Page Layout tab.
7. Paper Size
Most worksheets can be printed on the standard 8.5" x 11" paper size. However, large data sets may call for other options, such as the 8.5" x 14" legal size.
8. Margin Settings
A margin is the amount of space between the text and the edge of the paper. Excel's default margin style is Normal, which leaves a 0.7 inch space between the text and each edge of the paper. You can customize the margin style on the Page Layout tab by clicking Margins.
8. Scaling Options
Depending on how much data your worksheet contains, you may choose to scale the content to fit on one page. You can also choose to shrink the printout so none of the rows extend beyond one page high or so none of the columns extend beyond one page wide.
Image 3: Page Setup Group on Page Layout Tab
Table 2: More Excel Print Features
FEATURES/TERMS
DESCRIPTION
1. Print Area
Because many worksheets contain a large amount of data, Excel allows you to define a print area, which is the selection of cells that you wish to print. When printing a worksheet, you can choose to ignore the print area. To clear the print area, click Print Area > Clear Print Area.
2. Print Titles
The Print Titles button opens a dialog box where you can specify which rows or columns you would like repeated on each page.
Saturday, December 3, 2022
Selecting a Printer
When its time to select a printer you have to understand a few facts of a printer before you purchase one. So some of the fact that you should be looking into is size, capacity, speed, quality, and the cost. These are what I think are very important to look at first before deciding on what printer would work for you. I own a few printers and found this out by trial and error. So lets got through this to get a better understanding.
SIZE - Looking into the size of a printer may help you what direction you would have to lean into when and where your printer will be located. Will it be on a table/desk or a stand alone system. How much room do you have to spare?
CAPACITY - How much are you going to use the printer? Do you have to print out 100's of paper for school or work? Or is it you are just printing out 20 per week? If it just a few pages a week then the paper capacity doesn't have to be extremely large.
SPEED - How fast do you need these pages to print out? If speed doesn't matter to you this might help you on the cost of the printer. The faster you want it to print the more expensive the printer will get.
QUALITY - This is for me is about how my pages turns out. Just because you have a cheap printer that doesn't matter so long the prints are very clean/legible.
COST - Is something you would have to do your research on. Yes laser printers are more expensive up front but inkjet printers in the long run are more expensive to maintain. You also have to look into the cost of the ink or toner and how often you would have to replace them.
Here is same additional information from LabSim 2.1.10 to get a better understanding of some fact you should consider.
Inkjet
Inkjet printers spray small dots of ink from an ink reservoir onto a sheet of paper. Inkjet printers can produce high-quality output and are relatively inexpensive to purchase. However, they have several disadvantages.
- Replacement ink cartridges are expensive.
- Ink cartridges have limited print capacities.
- The ink tends to bleed into the paper.
- Prints tend to fade over time.
- The ink will run if it gets wet, unless special water-resistant ink is used.
Laser
Laser printers use electrical charges and heat to fuse tiny plastic particles (called toner) to the paper. Laser printers have the following advantages over other types of printers:
- They produce higher-quality print output.
- They can print documents much faster.
- They are ideal for large volume print jobs.
- Replacement toner cartridges are more economical than inkjet cartridges.
- They are better suited for sharing over a network.
- The ink is waterproof and doesn't fade.
- The output doesn't bleed into the paper.
- They are more expensive to purchase.
- They are more difficult to maintain.
Subscribe to:
Comments (Atom)